OPC/UA Client
The OPC/UA (Open Platform Communications Unified Architecture) Client configuration in the WP500 allows the device to securely connect to an OPC/UA server for accessing real-time data. This section provides step-by-step instructions for configuring the OPC/UA Client settings on the WP500 device through the web interface.
Client settings
This section provides step-by-step instructions for configuring the OPC/UA Client settings on the WP500 device through the web interface.
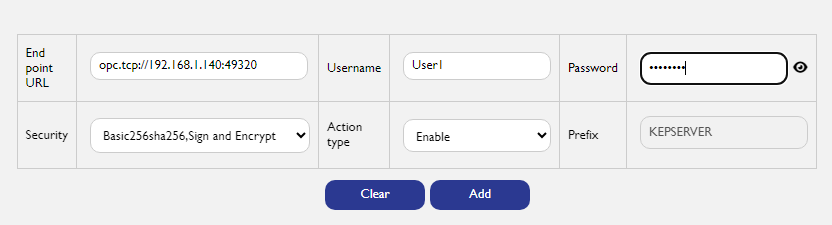
1. Enter the OPC/UA server's URL in this field. The format is typically opc.tcp://<IP_Address>:<Port_Number>.
- Example: opc.tcp://192.168.1.1:49320
2. Select the appropriate security mode for the connection. The security modes determine the level of encryption and signing used during communication with the OPC/UA server.
- None,None
- Basic128rsa15, Sign and Encrypt
- Basic256, Sign and Encrypt
- Basic256sha256, Sign and Encrypt
3. If the OPC/UA server requires authentication, enter the credentials here. These should match the access credentials configured on the server.
4. Choose the desired action for the OPC/UA Client configuration. This allows you to enable or disable the client connection.
5. Enter a prefix that will be applied to all tags collected by this OPC/UA Client. This helps in identifying tags related to a specific server or connection.
6. Saves and applies the OPC/UA Client configuration by clicking the Add button
Managing OPC UA Client Configurations:
- Editing Configurations:
|
Fields |
Description |
|
Select Configuration |
Click on the desired configuration from the list to edit. |
|
Update Details |
Modify the details as needed and click on the "Update" button to save changes. |
- Deleting Configurations:
|
Fields |
Description |
|
Select Configuration |
Click on the desired configuration from the list to delete. |
|
Delete |
Click on the "Delete" button to remove the configuration from the list. |
