Powering On the Device
Powering On Procedure:
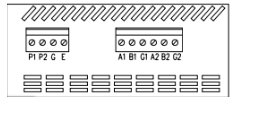
Connection of Power Points:
Identify the P1, P2, G, and E terminals on the WP500 device.
Connect the corresponding wires from the power source to the labeled terminals, ensuring a secure and snug fit.
Input Voltage Check:
Before powering on, verify that the input voltage supplied to the device is within the specified range of 24 VDC.
Use a reliable voltage meter to confirm the voltage level.
Wire Gauge Selection:
Choose an appropriate wire gauge for the terminal plug connections.
Refer to the specifications for the allowed range (12 to 28 AWG) and use copper wire for optimal conductivity.
Power On:
Once the power connections are securely in place and the input voltage is confirmed, proceed to power on the WP500 device.
Use the designated power switch or follow any specific instructions provided in the device documentation.
Created with the Personal Edition of HelpNDoc: Elevate Your Documentation Process with HelpNDoc's Advanced Features