MODBUS TLS Guidelines Procedure
This tutorial provides information about the MODBUS usage.
Install WpConnex Workbench and Runtime Service
Download and install from:
https://xxxx.com
Create a new Modbus Master configuration
To create a new Modbus Master configuration:
- Open the IO Drivers (
 )window.
 - Insert a configuration (
 ).
).
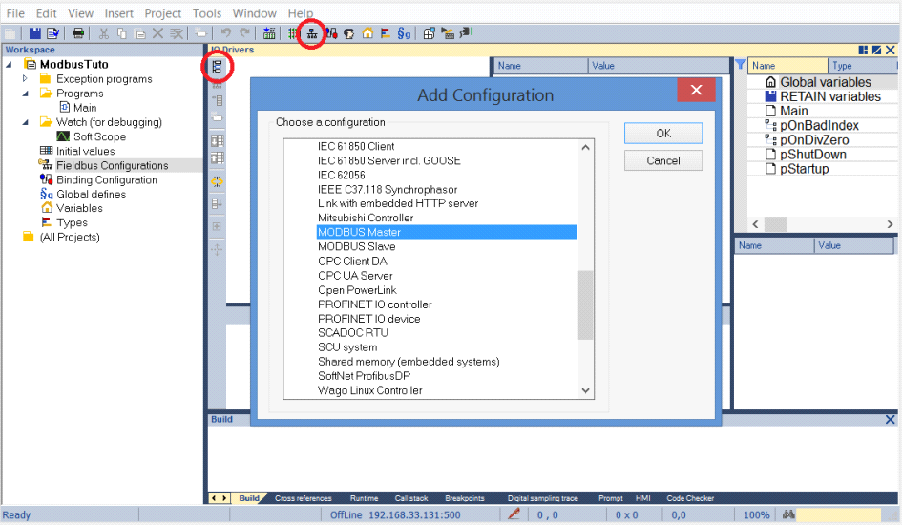
- Select the MODBUS Master driver:
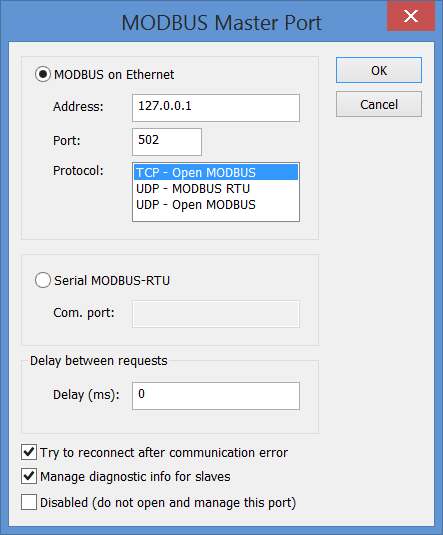
- Insert a Master/Port (
 ) corresponding to your MODBUS settings:
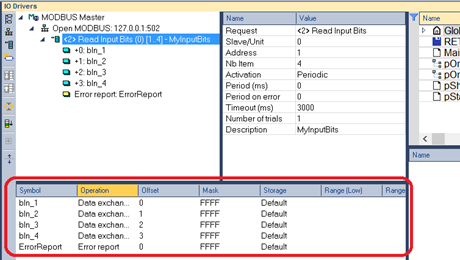
- Insert a Slave/Datablock (
 ) and enter the corresponding information.
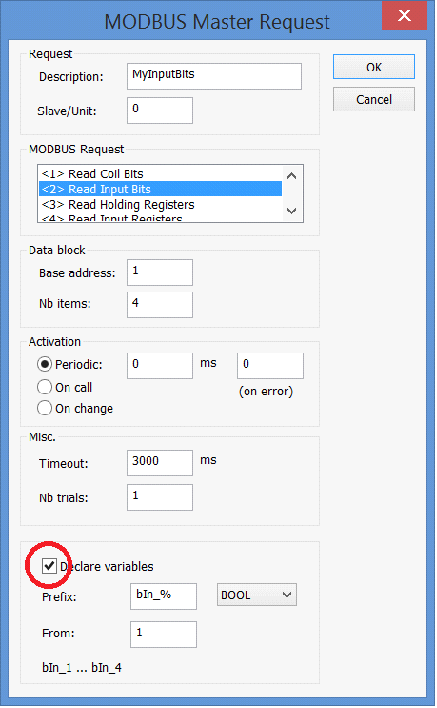
Note: It is possible to automatically declare the variables by checking the Declare variables
checkbox. The name of the declared variables must be filled in the Prefix cell.
- Variables can be inserted one by one. Use the Insert Variable button (
 ) and enter the corresponding information.
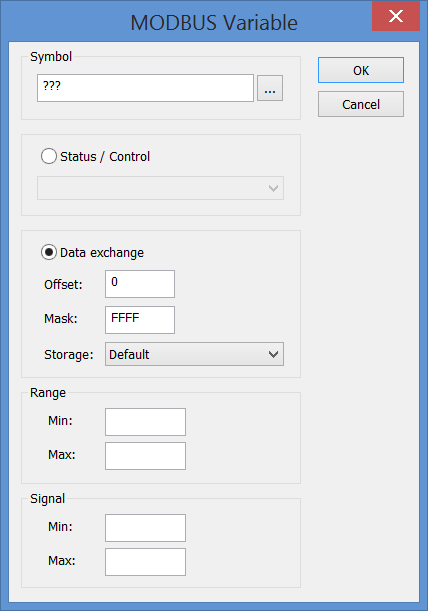
When a variable is mapped to a data block in a master configuration you can select it to be:
🞂 An exchange of data (exchange between the MODBUS map and the T5 variables).
🞂 A status (diagnostic information provided to the application).
🞂 A command (using a variable for driving the stack).
- Variable information within a data block can also be edited in the grid. From this grid it is also possible to declare variables in the database doing a right-click on a variable.
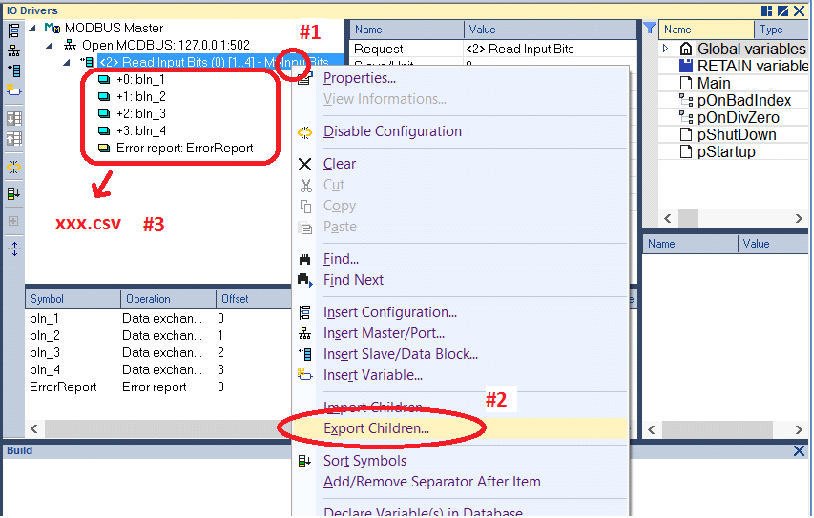
- The import/export in a CSV format is available using the right-click mouse button on an element of the configuration and then choosing to Import/Export Children.
This feature will import/export the sub-level. For example, a right-click on the Datablock (#1) and then Export Children (#2) will export all the block’s variables (#3). An export from the Port will export only the Datablock configuration, etc.
Modbus communication through TLS
Since the version 12 of straton our MODBUS-TCP protocol is equipped with a TLS option.
This part of the tutorial assumes that you already have certificates ready to use on your targets, if this is not the case please refer to tutorial TLS_security_for_straton.
Master configuration
On the driver’s first level, select Enable TLS.
On the level 2, double-click on the parameter TLS which should be to Disabled then click on Enable Transport Layer Security (TLS).
Certificate path (Private/CA) => path to the “Private” and “CA” folders.
Private Certificate (.pem) => certificate complete name.
Peer certificate Subject (CN) (optional) => Common name of the server certificate following this
model “/CN=<common_name>”.
Slave configuration
Unlike the Master, the configuration of the Slave is not done through the configurator but in an file which should be stored at the same location than the Runtime Service binary.
Create the file “t5secure.dat” (/!\ do not change the name).
Example:
[*:1100] KEY_CERT=SERVER.pem PEER_CN=/CN=CLIENT PUB_CERT=
TLS_MIN=2 TLS_MAX=3
PKI_PATH=<path to the “Private” and “CA” folders>
CIPHERS= CIPHERS13= [TRACE] LEVEL=1
Please refer to the following table to adapt your file according to your needs
|
Parameters |
Key Words |
Values |
|
Private key file |
KEY_CERT |
STRING - Certificate filename (without path) /!\ Mandatory /!\ |
|
Public certificate file |
PUB_CERT |
STRING – Public certificate filename (with path) Hardcoded : EMPTY – use the same as “KEY_CERT” |
|
Min TLS version allowed |
TLS_MIN |
(TLS_NONE) 0 (TLS_11) 1 (TLS_12) 2(Hardcoded/Default) (TLS_13) 3 |
|
Max TLS version allowed |
TLS_MAX |
(TLS_NONE) 0 (TLS_11) 1 (TLS_12) 2 (TLS_13) 3 (Hardcoded/Default) |
|
Parameters |
Key Words |
Values |
|
Certificates path |
PKI_PATH |
STRING - Path (to /CA & /PRIVATE folders) |
|
Permissive ciphers |
CIPHERS |
STRING - Enumeration separate by colons (OpenSSL format) Hardcoded : EMPTY – no restriction |
|
Permissive ciphers TLS1.3 |
CIPHERS13 |
STRING - Enumeration separate by colons (OpenSSL format) Hardcoded : EMPTY – no restriction |
|
Expected subject of the peer's certificate |
PEER_CN |
STRING - Common name (/CN=xxxxxx) Hardcoded : EMPTY – peer certificate subject not considered |
NOTES : “[*:1100]” is used to specify the communication port. You can change it with the MBSLAVETCP block.
Download the application
Download the application to the Runtime Service:
🞂 Select the communication parameters in Menu Tools/Communication Parameters
🞂 Establish the connection through Menu Project/Online RESULT IS:
![]()
The download is successful and application starts correctly.
![]()
The Runtime Service is not started or communication parameters are wrong.
![]()
The application is not yet downloaded or an error occurs during startup. More detail can be found in the output view.